
I have gained a lot of knowledge from this forum and would like to share my recent experience with a problem I had.
I own a 75 MGB and the oil damper in the Zenith carb was using a lot of oil. In fact every other day I was refilling it. The manuals say top off every 3000 miles or so. As you know if there isn't sufficient oil in the damper it makes for hard starting. I did some reading in the various repair manuals and learned there is a little oil seal down inside the tube where you fill the damper. I imagined this would be easy to change - not exactly.
I ordered the seal from Moss and also the Zenith carb adjusting tool, approx $9. You need this tool to change the seal.
To change the seal:
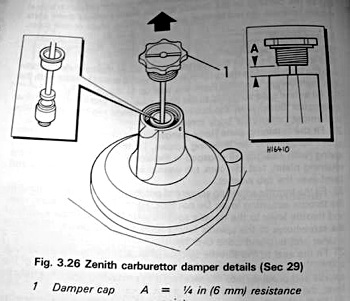
- Remove the damper cover (4 screws).
- Carefully pull out the cover and diaphram attached to it.
- There will be a big spring - set this aside.
- Now you have in your hand a piston looking item with a needle coming out of the end.
- On the side of the piston is what they call a grub screw. Slightly loosen the screw (do not remove).
- Take the carb adjusting tool and insert down the oil reservoir oil into the the adjuster. The outer part of the tool has a little tang that should be inserted in the notch on the tube.
- Turn the center part of the tool 3 or 4 turns CCW and the needle from the bottom will release (unscrew).
- Set the needle aside.
- Now you must remove from the inside the resevoir tube a little star washer locking device. I used a dental pick to get under one of the little tangs and pulled it out thru the tube.
- Now the oil seal carrier will push out the top, using a screwdriver to push it up thru the bottom.
- Finally the oil seal is exposed. Change it and re-insert the carrier. Mine was hard and had flat edges at approx 80,000 miles.
Now the rest is a reverse of the removal. A trick I found is only insert the carrier in the tube just enough to lay the lock ring on top of it. This prevents it from getting cockeyed in the tube. Push the 2 thru the tube together until it locks in place. Screw in grub screw a little loose. Re insert needle from bottom. Tighten using adjuster tool 3 or 4 turns. Tighten grub screw. Re insert (with spring) piston and cover on carb observing the divit on the edge of the diaphram that goes into the notch on the edge of the carb.
I also turned the rich/lean adjuster all the way left and all the way right counting the turns and then centered it for further adjustment. Bingo - no more oil leak. Hope this is a worthwile contribution to the website.

")


Tried 2 different rings with no success.
A 6mm ID metric O-ring does the trick. It is difficult to assemble because it is so tight but absolutely NO leaks.
RE. Grub screw. My grub screw has a spring loaded tip. I tightened it all the way down. It holds yet allows adjustment of the needle. No problem.
Want to leave a comment or ask the owner a question?
Sign in or register a new account — it's free