
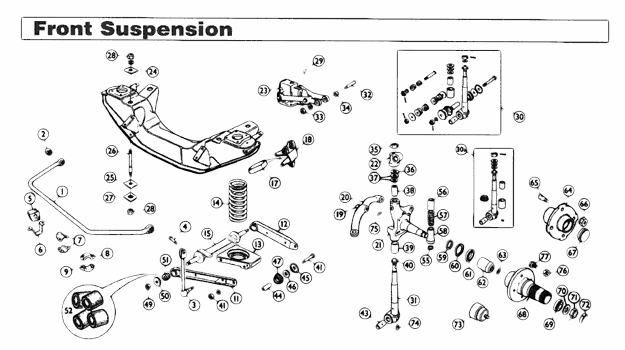
MGB Front Crossmember and Suspension Parts Diagram, courtesy Moss Motors
How to remove the MGB front suspension and crossmember is a common question on the MG Experience forums.
I pulled mine last weekend, here are the steps I followed:
Front Crossmember Removal Procedure:
- Put jack stands under the castle rails and floor jack under the spring pan on the side you're starting.
- Remove tie rod end from steering arm - may be easier said than done.
[A "pickle fork" or ball joint separator tool makes this step a lot easier - Ed.] - Unbolt sway bar end (which you probably don't have)
- Unbolt the brake caliper and set aside. A smallish cardboard box is handy as a resting place.
- Remove lower trunnion bolt (41)
- Slowly release floor jack to lower the A-arm (spring pan), releasing the spring.
The spring will go spoink and just sorta fall out. There isn't enough energy stored in it to be any danger. - Remove wishbones and spring pan (optional) or just leave it hanging.
- Remove upper trunnion bolt (32) and remove kingpin/hub/rotor assembly.
- Repeat on the other side.
- Now that's all done, disconnect the steering rack and brake lines from the crossmember.
- Support the crossmember with a floor jack in the center.
- Remove the 4 large crossmember nuts (28) from the top with an impact wrench (inside engine bay on top of frame rails).
[Note that there are nuts on both sides of the crossmember, with a threaded rod between them as you can see in the diagram below; if the nuts are rusty, it may help to let some of the crossmember weight hang on the rods. If you don't use an impact wrench, the opposite nut may spin. - Ed.]
- Lower crossmember without all that extra weight hanging on.
Reverse the order to reinstall.
[Ed. Note- Another description of the removal and rebuilding procedure can be found in this tech article]
[Ed. Note- Alternate procedure added below based on feedback from other members -Skye]
Alternate Procedure:
If you don't want to disassemble the front suspension in situ, you can follow this alternate procedure and drop the crossmember and suspension as one whole unit. This method is probably better suited to more experienced mechanics.
- Take off steering rack.
- Disconnect sway bar from frame (if you have one)
- Disconnect metal brake lines.
- Remove 4 large nuts from the top with an impact wrench.
- Lower on floor jack (or let it fall if you're an animal)
Front Suspension Disassembly & Reassembly Notes:
- When you release the upper trunion bolt, the rotor/hub assembly will fall crashing to the floor. Best to have something soft like a pillow or small child under it.
- Just to reiterate: The springs do NOT have all that much tension on them. Just lowering the jack slow and easy, bringing the spring pan down to the vertical, will release them without any problem.
- If you can, leave the tie rod end locking nuts in place - just cracking them a tad if needed to release tension on the T/R. A spritz of spray paint on the threads - allow time for it to dry - is helpful in case you have to move them back more. A 3/4" (IIRC) open-end wrench and large vice grips are all you should need to remove the T/R (wrench for the tie rod, vice grips for the shaft). If you're replacing the rack boots, you'll have to remove the nuts anyway, so the spray paint gives you a starting point for alignment when you're done.
- If you aren't removing the steering rack from the car, you can zip tie/wire tie/rope the rack in place using the fan pulley as a holder - just leave it dangling there.
- Torque to the following specs, AFTER the car is on the ground and you've bounced it a couple of times.
| Suspension Torque Specs | |
|---|---|
| Front shock absorber bolts: | 44 ft lbs |
| Brake caliper mounting bolts: | 43 ft lbs |
| Hub nut, align to next hole: | 40 ft lbs |
| Crossmember to body nuts: | 55 ft lbs |
| Shock absorber pinch bolt: | 28 ft lbs |
| Lower arm nuts: | align to next |
| Split pin hole: | 28 ft lbs |
| Lower arm/spring pan nuts: | 22 ft lbs |
| Stabilizer bar link nut: | 60 ft lbs |
| Swivel pin nut: | align to next |
| Split pin hole: | 60 ft lbs |
| Steering arm bolts: | 63 ft lbs |
| Steering tie rod locknuts: | 35 ft lbs |
| Steering rack to crossmember: | 30 ft lbs |
| Disc brake rotor to hub: | 43 ft lbs |
| Wheel lug nuts (Bolt-on): | 60 to 65 ft lbs |

")


"Pickle Fork" removes tie rod ends in seconds and it has many uses around the shop .. its a great and sturdy pry bar.
Wish bones are actually 3 pieces and seperating the pieces may ease removal.
Also, regarding the tie rod ends, I just loosened the boots for the tie rods, backed off the lock nuts one flat, and unscrewed the whole tie rod, leaving the ends in place. Why fight it? When you put it back together, leave enough rod for one flat tightening of the lock nuts.
Otherwise, spot on Rick!
Want to leave a comment or ask the owner a question?
Sign in or register a new account — it's free